Sunday, January 5, 2014

Cedar Plank Salmon & Tilapia

Cedar Plank Salmon & Tilapia


Review: 9/10 - these turned out great... (This was also the "easiest" thing I have cooked on the BGE yet). The cedar flavor was very subtle and the tenderness of the fish was amazing. I attempted to cook at an even 400 degrees, but I also cooked asparagus and had to keep opening the BGE lid to turn - hence, resulting in ~375 degrees. The fish took about 25 minutes to reach an internal temp of 145, but it was well worth the wait. I used a fair amount of Arthur Bryant's Fish Seasoning, which was great and definitely did not over power the fish. Purists would really enjoy the true flavor of the fish as I prepared it, but as I am not a purist, I would probably go a little heavier on the seasoning next time.

(My wife loves salmon, as do I, but unfortunately I am either allergic to it, or it gives me horrible acid reflux - either way that is why we did two different fish)

BGE Settings:
1. Hickory & Oak Lump Wood Charcoal
2. Direct Heat at 400 degrees

Ingredients:
1. Sockeye Salmon (11 oz filet)
2. Tilapia (11 oz filet)
3. Arthur Bryant's Fish Seasoning
4. Western Cedar Planks
5. EVOO (Extra Virgin Olive Oil)
6. Lemon

Recipe:
1. Soak the cedar plank(s) in water for a minimum of 4 hours


2. Coat fish with a little EVOO and Arthur Bryants Fish seasoning and refrigerate


3. Let fish set at room temperature for 30 minutes prior to grilling
4. Stabilize BGE at 400 degrees (direct heat)
5. Place cedar plank on grill for about 4-5 minutes (until it starts to steam/smoke)
6. Flip the cedar plank and coat the top with EVOO
7. Place fish on cedar planks (do not flip fish during grilling) and top with slice of lemon


8. Remove fish once internal temperature reaches 145 degrees


9. Cover with foil for 10 minutes


10. Serve with favorite vegetable or sides (I like grilled asparagus)


Happy Eggin...

Chris

Friday, January 3, 2014

Chris' Kick-Ass Chili

Chris' Kick-Ass Chili


(I have not tried this on the Big Green Egg...yet! - I first need to get a dutch oven or cast iron pot large enough for the recipe but also fit in the egg)

A lot of people have tried my chili, and almost everyone has said it is the best they have ever tasted... (they could be trying to save my ego, but I will take it anyway!)

My chili is somewhat unique in that it has a ton of ingredients, yet is very consistent. I cut everything small, because my philosophy for chili is that every bite should taste the same... (I don't want to get a hunk of onion in one bite and a hunk of pepper in another and have different tastes with each spoonful)

Before you decide to partake on this endeavor, I will point out a few things and modifications (the below recipe is about 7 years old and I have modified a few things)...

1. There are 41 ingredients... even if you have most of the spices handy, it will still cost over $40+ to make this batch - but you will have chili for weeks (unless like my wife and I, you end up giving a lot away)

2. Although the recipe calls for Guinness beer, I have actually stopped using it. I prefer a hoppy IPA, but any beer will do (I have actually used High Life on more than one occasion)

3. In the instructions, it says to use a processor to dice the vegetables - I actually recommend against this, as it can create a puree instead of a fine dice... I actually use a cool tool from Pampered Chef - their Food Chopper. (I cut the vegetables to small pieces with a knife and then finish them off with the chopper to get finely diced consistency)

4. Instead of 4 cans of beans, I have lowered it to 2-3... I'm just not a big fan of a lot of beans in my chili (you could actually cut them completely out if you want)

5. It is important to let simmer for 8 hours, but I don't refrigerate overnight anymore (When I wrote this recipe, it was primarily for football tailgates, hence the overnight refrigeration... now I just cool down and freeze in containers whatever I will not eat within a few days)

6. I have changed up the meats for several batches (once did a game batch - boar, lamb, deer, buffalo, bison) - but 90% of the time, I stick to the below meats.

7. Nowadays, I just eyeball each ingredient - which gives each batch its own character. I also have changed up the hot pepper selections from time to time (almost always add a couple habanero peppers now) - this can change the heat and flavor as desired...

8. The biggest instruction is to make with love... I have got the process down to about 3 hours until simmering, but still a big endeavor....

Without further adieu, I present to you my recipe...

Here is the link to the original document, in case you want to save/print:
Chris' Kick-Ass Chili


Enjoy!

Happy Eggin...

Chris

Blue & Gouda Bacon Stuffed Burgers

Blue & Gouda Bacon Stuffed Burgers

Review: 8/10 - My wife enjoyed these more than I did and gave them a 10/10 - I wasn't as impressed. I expected the flavoring from the stuffing to be more prevalent. The cheese melted completely and the burgers were very tender. I loaded mine with toppings - lettuce, tomato, onion, hot pepper relish, mayo, ketchup and mustard, while my wife simply put ketchup and mustard on hers - which could be why she noticed the flavor more and enjoyed more so. I will cook these again, using the same BGE settings, but will try different stuffings with more flavor (like mushroom & swiss or prosciutto & habanero cheese)

The Egg likes the snow!!! (of course while it is covered on the screened-in deck)


BGE Settings:
1. Hickory & Oak Lump Wood Charcoal
2. (1) Jack Daniels Whiskey Oak Barrel Block (from Bass Pro Shop)
3. 400 degrees at direct heat

Ingredients:

1.  Meat
     a. 1 lb Ground Beef
     b. Worcestershire
     c. A1 Sauce
     d. BBQ Sauce
     e. Salt & Pepper
     f. Weber - Blazin Burger Seasoning

2. Stuffing:
     a. 1/3 lb bacon - cooked and chopped
     b. Blue Cheese (crumbled)
     c. Gouda Cheese (dice into 1/4" chunks)
     d. Salt & Pepper

Recipe:
1. Prepare ground beef by mixing with small amounts of Worcestershire, A1, BBQ, Salt & Pepper
2. Use burger press to shape burgers (keep them thin as two patties will create one burger)


3. Layer stuffing on one patty


4. Cover with another patty and press to close edges and create one burger
5. Sprinkle Webber Blazin Burger Seasoning on burgers


6. Refrigerate until ready - let sit at room temperature for 30 minutes before grilling)
7. Stabilize BGE at 400 degrees
8. Cook for 5 minutes then flip and cook for 5 more minutes or until one temp less than desired temp (I prefer mine at medium-well, so I take them off when medium)


9. Remove from BGE and cover with foil for 10 minutes - this will finish cooking burgers to desired temp.


10. Toast buns for 2 minutes on BGE


11. Enjoy with a cold beer!

 "I like mine with lettuce and tomato, Heinz 57 and french-fried potatoes, a big kosher pickle and a cold draft beer" - Jimmy Buffet

Happy Eggin...

Chris

Thursday, January 2, 2014

Smoked Whiskey BBQ Chicken Breasts

Smoked Whiskey BBQ Chicken Breasts

Review: 9/10 - These chicken breasts turned out phenomenal! The were amazingly moist and tender (again - did not need a knife to cut - fork sliced them like butter) - they melted in the mouth! Even though they only cooked for 50 minutes (they were large breasts), the smoke flavor was prevalent even with the BBQ sauce. I didn't taste as much of the Jack Daniels Whiskey Block flavoring that I would have liked, but it was still very good. My wife said it was the best chicken she had ever eaten.

BGE Setting:
3. Indirect heat (using plate setter) at 300 degrees
4. For last couple minutes of grill time, full open top and bottom vents

BBQ Sauce Recipe: (eyeballed)
2. 2 oz Crown Royal
3. 2 tbsp honey
4. 1 tbsp cayenne pepper
5. 1 tbsp dry mustard
6. 1 tbsp ketchup
7. 2 tsp Sriracha sauce
8. 1 tsp garlic powder
9. 1/4 cup water (to thin sauce for injection)

Recipe:
1. Set aside some sauce to coat chicken after it is done
2. Inject chicken breasts with sauce
3. Coat chicken with leftover (from injecting sauce) and marinate/refrigerate
4. When ready, let sit at room temperature for 1 hour
5. Stabilize BGE at 300 degrees - indirect heat and place chicken breasts on grill

6. Cook at 300 degrees until internal meat temp reaches 145 degrees
(I flipped chicken 3 - 4 times and coated with leftover marinade each time)
7. Once meat reaches 145 (took me about 45 minutes), open bottom and top vents all the way (my BGE jumped to 500 almost immediately) and place chicken on perimeter of grill (where flame/heat comes up)
8. Cook for about 5-10 minutes more, until internal meat temp reaches 155 degrees
9. Remove chicken and cover with foil for 10-15 minutes
10. Slice chicken and coat with sauce you set aside


(I served with butter rice and broccoli)

Happy Eggin...

Chris


Tuesday, December 31, 2013

Foil Wrapped Potatoes and Peppers

Foil Wrapped Potatoes and Peppers

Review: 7/10 - these turned out exactly as expected and were tasty and fully cooked (not undercooked and hard or overcooked and mushy). The fact that these are wrapped in foil and only cook for a short time, there is no flavor added from the egg. These would have turned out the same if I put in the oven for 25 minutes at 400 degrees. I may try cooking them a different way on the egg in the future to try to get some crispiness and/or more flavor from the wood.


BGE Settings:
1. 400 degrees at indirect heat (use plate setter)

Ingredients:
1. Potatoes
2. Peppers
3. EVOO (Extra Virgin Olive Oil)
4. Half stick of butter
5. Seasonings (I used salt, pepper and Lowerys)


Recipe:

1. Slice potatoes
2. Slice peppers (I decided to use orange and green bell)
3. Lay a piece of foil down
4. Place potatoes and pepper on foil
5. Coat with olive oil, seasonings and slices of butter


6. Place another piece of foil (same as original size) on top
7. Roll/Fold each side at least 2 folds


8. Stabilize the BGE at 400 degrees on indirect heat
9. Cook for 25 minutes, flipping once halfway through


Happy Eggin...

Chris

Smoked Pork Loin x3

Big Green Egg - Smoked Pork Loin (3 recipes)

Review: 10/10!!! First BGE Adventure = SUCCESS! They turned out amazing! Everyone said it was the best pork they've ever had... No one even needed a knife - all 3 loins were so moist and tender, you could cut them with your fork and they literally melted in your mouth. I attribute the success to a couple factors....

1.  Pulling from the BGE right when they hit 145 internal meat temp. (The USDA changed the temp of pork from 160 to 145 in 2011 and what a difference 15 degrees makes)

2. FTC (Foil-Towel-Cooler) - I did this for 2.5 hours (putting a pot of boiling water in the cooler at the 1.5 hr mark to maintain heat) - they were still hot (maintained temp) after this time and I think it added to the moisture and tenderness

(Recipes at bottom)

Meats:
a. Jalapeno-Butter Injected Stuffed Pork Loin
b. Hot & Spicy Butter Injected Pork Loin
c. Bacon-Wrapped Brined Pork Loin

BGE Specific:
c. Big Green Egg, using plate setter for indirect heat
d. Goal: BGE dome temp - 200 deg. for ~6 hrs until meat temp is 145 deg.
(Lesson Learned: It took a little bit of work to keep it around 200 degrees - for 90% of the cook it remained between 200 and 240, sometimes more, sometimes less - it only took a little over 4 hours to get to meat temp of 145 deg)


As I mentioned in my first post, my brother-in-law gifted my wife and I with the large BGE for Christmas and we subsequently invited him over for New Years Eve to christen it.

He brought over a torque wrench to help finish the assembly and on his way over, stopped at the grocery store to purchase a meat (and a bag of lump charcoal) for us to grill (an add-on to his already amazing gift).

While, he had planned on getting a pork butt or shoulder, he found an amazing deal on pork loin and purchased a 10 lb pork loin.

Neither he, nor I, realized that loin is a very lean meat and not made for slow cooking (as it tends to dry out) and rather is best for a faster cooking time. However, both of us wanted to test one of the true benefits of the BGE (smoking and slow & low cooking) and were determined to make this work.

After extensive research, I decided I would go ahead with the loin and try to slow cook it, while maintaining flavor and moisture.

Here is my first attempt at the BGE


(Side note: I didn't determine I would start a blog until after the loins have been marinating for over 12 hours, so unfortunately the original prep work will be photo-less - this will not be a recurring theme, as I will try to photo all steps for future cooks)

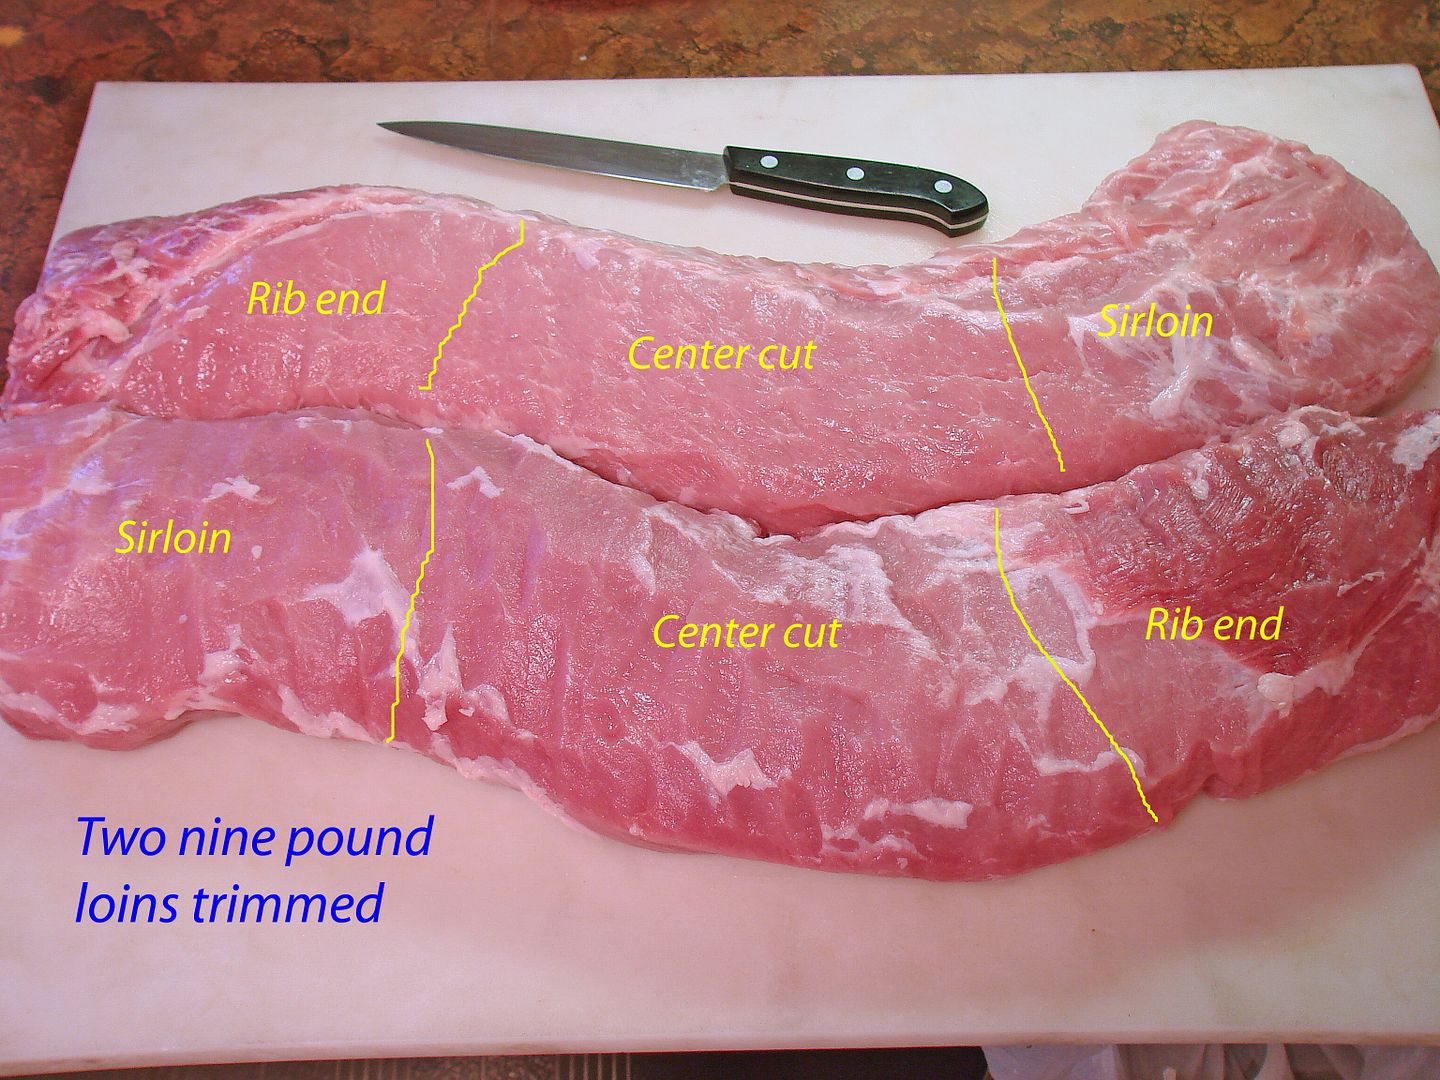
1. I determined that the 10 lb loin would be to large for the egg (although I could have bent it to fit), but also wanted to try 3 different methods for 2 reasons. First, in case one of the methods fails (too dry, bad taste, etc), and second, to have a variety of flavors from the first BGE cook. So, I cut the loin into 3 different parts - the sirloin, the center cut, and the rib-end. (pic from internet)


The actual recipes (with pictures) are below, but here was my process:

1. Prepare each recipe and let marinate/brine for 18 hours
2. Remove meats and let sit at room temperature for 1 hour 
 3. Prepare the BGE by lighting the wood charcoal/wood chunks and get burning
4. Add plate setter and drip pan and pan with apple juice and apple cider vinegar
(Helpful hint: Place 4 stacks of 4 pennies on the plate center and then place the drip pan on the pennies - this prevents the drippings from burning too much from the direct heat)
5. Add meat to BGE
6. Stabilize dome temp to 200 deg - close top vent to a little more than a sliver open and bottom vent about 1/4" open
7. Grab a beer or Crown Royal and sit back and relax
8. After the internal temp of the meat reaches 145 degrees, remove and "FTC" (Foil-towel-cooler)
     a. Wrap the meat in foil, nice and good
     b. Wrap the foil in towels
     c. Place the towels in a cooler
     (If you want to keep the meat in FTC for more than 2 hours, pre-heat the cooler by placing a pan of boiling water on a towel in the cooler)
     (There are a lot of people that will FTC regardless of wait time, because it makes the meat moist and maintains the temperature - most will do it for a minimum of 30 minutes)

Recipe #1 - Jalapeno-Butter Injected Stuffed Pork Loin (center cut)


1. Cut the pork loin center-cut, using a C-cut method to essentially "unwrap" the meat https://www.youtube.com/watch?v=2eCpL6cj7Rw
2 Inject the meat with a half-jar of "Cajun Injector - Jalapeno Butter" marinade
3. Cover the meat with:
     a. Philadelphia Spicy Jalapeno Cream Cheese
     b. Apple Smoked Gouda Cheese (sliced thin from block)
     c. Chopped Pineapple
     d. Chopped Orange Bell Peppers
     e. Chopped Jalapeno Peppers (de-seeded)
     f. "Rub Some Butt" Seasoning
3.  Wrap the loin and tie with Butcher's twine (I asked the Safeway butcher for some and he obliged with a large amount for free)
4. Rub with "Rub Some Butt" Seasoning
5. Cover and refrigerate for 18 hours

Recipe #2 - Hot & Spicy Butter Pork Loin (rib end)

 
1. Inject the pork loin rib-end with "Cajun Injector - Hot & Spicy Butter"
2. Use about 3/4 of the jar to inject & use the rest + what escaped from injecting to marinade
3. Leave to marinate - cover and refrigerate for 18 hours

Recipe # 3 - Bacon-Wrapped Brined Pork Loin (sirloin)


1. Make a brine, using: (I didn't measure and simply eye-balled, but I will give estimates)
     a. 3/4 gallon of water
     b. 1/2 gallon of apple juice
     c. 1/2 cup of apple cider vinegar
     d. 1.5 cup of Morton's salt
     e. 1 cup sugar
     f. 3 tbsp black pepper
2. Marinate in the brine and refrigerate for 18 hours
3. Lattice thick-cut bacon and wrap the loin, then secure with butchers twine

I served with Foil Wrapped Potatoes and Peppers and Grilled Pineapple...


Happy Eggin...

Chris


Finally... I am a proud owner of THE Big Green Egg!

Santa must have had me on this Nice list this year!


Christmas morning, my wife and I were pleasantly surprised to open an excellent present from her brother - the Big Green Egg. (He actually had us open the nest, and left the actual Egg, etc. in the car)

We immediately made plans to christen the Egg on New Years Eve and invited him over to partake.

Here is a picture of my new Egg (Large Size), almost finished setting up. (Needed to wait for a torque wrench to arrive to finish)


"Aint she a beaut, Clark" - Cousin Eddie

I am really excited to start using the Egg and will be experimenting heavily until I consider myself to be a guru. (okay - I will be happy with expert level)

Anyhow, this blog will include all of my adventures of the BGE, including:

1. Recipes
2. Pictures (when remembered and possible)
3. Reviews

I welcome all input, advice and commentary...

I hope you enjoy this adventure and possibly gain something from it!

Also, "BGE" (as the community calls it) will be used in lieu of "Big Green Egg", henceforth.

Happy Eggin...

Chris